Have You Drained & Flushed Your Water Heater? You Should! Here’s Why!
Be honest, when was the last time you drained and flushed your hot water tank/heater? Last year? 5 years ago? Never?!?! Did you even know that was something you should be doing semi-regularly? Well I can assure you that not only is it something you SHOULD be doing, it’s something you should be doing every year!
Why Should I Drain my Water Heater?
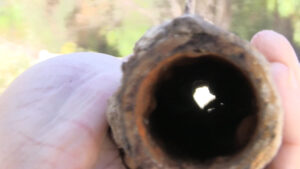
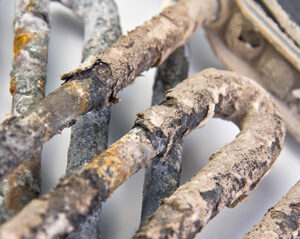
Most homeowners I talk to have never drained and flushed their water heater. Understandable I suppose, it’s not something you learn about in school so if you never knew you were supposed to, why would you? Flushing your water tank is really simple and it helps prolong the life of the tank. Over time, lime, calcium, and other minerals in your water can create deposits in the tank. (Especially if you have hard water) Periodically draining and flushing your water tank helps loosen sediments that build up and cause problems with the heating elements. Over time, deposits and corrosion can shorten the life of the tank. There’s never a good time to not have hot water in your home! Now’s the time to add it to your to-do list! Here’s how to do it!
Step #1: Turn off the Power & Supply Valve
 Either shut off the gas at the shutoff valve (Typically a valve connected to a yellow flex gas line running to the tank), or unplug the tank if it’s an electric tank. (You can also turn off the breaker to the water heater if you’re uncomfortable unplugging or unsure.)

Also close the cold water supply line valve. There’s typically a valve at the top of the tank. (If you’re not sure, you can CAREFULLY touch your hand on the pipes at the top to see which one is warm and which is cold. Don’t burn yourself! You want to shut off the cold supply line.) If you don’t have a valve there, shut the water off at the closest available shutoff OR you can shut off the main valve to the house if you need to.
Step #2: Connect a Hose to the Drain Valve

If you don’t have an already established drain line, connect a garden hose to the drain outlet on the bottom of the tank. REMEMBER THAT THE WATER IN THE TANK IS HOT! Either let the tank sit idle for a few hours, or carefully direct the hose outside or into your sump pump if you have one. Make sure the hose is directed to a safe place where no children or pets can be scalded by hot water.
Step #3: Open the Drain Valve
Open the drain valve and allow all the water in the tank to run out. Depending on the size of the tank, this can take 15-20 minutes to drain. You’ll typically need a flat head screwdriver to open the valve.
Step #4: Turn the Water Back On
Once the water stops running from the hose, turn the water back on. You’ll want to allow the tank to flush directly out the hose for a few minutes. After that, I recommend you close the drain valve and allow the tank to fill at least halfway or so. Allow the tank to fill for 10-12 minutes.
Step #5: Shut Off the Water Again and Repeat Flush
Basically you’re going to do the same thing again. Shut off the water supply and open the drain valve. You’ve just flushed the tank to get the water to stir up any loose sediment and get it to be able to drain from the tank. Allow all the water to run from the tank again.
Before you turn the water back I recommend you also check the Anode Rod.
What is The Anode Rod?
 Most homeowners I talk to don’t know what an anode rod is let alone know that it’s something that needs to be maintained with your hot water heater. The Anode Rod is a piece of sacrificial metal (usually magnesium or aluminum) that is located within your water heater. It attracts the corrosive elements of your water like calcium away from the internal components of the tank and your tank walls.
Changing your anode rod should be done every few years to make sure the life of your water heater isn’t shortened prematurely because of corrosion.
Step #6: Check or Replace the Anode Rod

The anode rod is mounted to the top of the tank and is threaded in place within the tank. Use a socket wrench or pliers to unthread the rod and check it for wear. If it is badly corroded or completely disintegrated, you need to replace it. Do a quick google search to find a replacement rod for your particular brand of water heater.
Once you reinstall the new anode rod…
Step #7: Reconnect the Heater
Make sure all valves and fittings are tightened and then turn the water supply valve back on for the tank allowing it to fill once again. Re-open the gas valve and follow all safety instructions to re-ignite the heater if you have a gas tank. CAUTION: Failure to follow ignition instructions can cause injury or death. Carefully follow all instructions.
If you have an electric heater, plug it back in or turn the breaker back on to the unit.
How Do I Know if it’s Time to Replace My Water Heater?
There are several warning signs that your water heater might be on the outs! Here are a few things to look out for. Some issues can be repaired with new parts, while other issues may indicate the need for a new heater. Here’s what to look out for.
1.) Over 10 Years Old
If your water tank is over 10 years old, it might be time for a replacement. If you’re not having problems yet there’s no need to swap it right away, BUT you should probably budget for a new one because you’ll inevitably need one in the next couple years. Electric tanks typically have a little longer life span but both can be shortened by hard water.
2.) Leaking
If your tank is leaking, that’s a big sign that it needs replacing. It often happens on older tanks where corrosion and rust are problems. Sometimes it can be the result of keeping the temperature on the tank set too high or a faulty pressure relief valve. Over time that increased pressure can cause wear on the components.
A leaking tank can be extremely dangerous if not addressed as a leak indicates an issue with the integrity of the tank that can lead to a tank explosion! BAD NEWS BEARS!
3.) Discolored or Cold Water
 If you’re getting rusty colored water or cold water after a short period of time, that could be an indication that your water heater needs attention. Especially with the latter. Old houses can have old galvanized pipes which corrode a lot so it may not be indicative of a faulty tank BUT if you’re noticing that AND a change in water temperature, you’re likely having an issue with the tank.

It could be that a heating element needs replacing because it has corroded. OR you may need to replace the tank itself. In either case, a closer inspection is warranted to find the problem.
Installing a New Water Heater
WARNING: Installing a new water heater carries the risk of electrical shock and/or exposure to gas fumes/vapors and can carry the risk of explosion if not done correctly.
Installing a new water heater isn’t a job for the faint of heart and can be a little dangerous IF you don’t know what you’re doing. It is a task that a handy homeowner can accomplish on their own BUT as always it’s something that needs to be done carefully and correctly. If there are any doubts about your ability to do it, I’d recommend that you leave it to a professional.
Need to Replace an Electric Water Heater?
Check out the New High-Efficiency Rheem ProTerra Hydrbid Electric Water Heater with Leak Guard.
 The Rheem ProTerra Hybrid Electric Water Heater is 4x more efficient than a standard electric water heater, and has an automatic water shut-off in the event of a leak to provide additional peace of mind. You can also control the settings of your water heater directly from your mobile device for added flexibility and is installed just like a standard electric water heater.
If you enjoyed this content, check out some of these other DIY home maintenance projects.


