How to Install an Electric Vehicle (Tesla) Charger
It’s no secret that gas prices have been through the roof lately. That has motivated a lot more people to consider transitioning to an electric vehicle. My wife and I have had a Tesla Model 3 for a few years now and I personally love the car. Today I’m going to show you how to install an electric vehicle (Tesla) charger in your home in the event you decide to go electric.
Disclaimer:
 As with every video I do that involves electricity, I want to warn you that working with your electrical panel carries risk of injury or death and that I am not a licensed electrician. However, I have a lot of experience working with residential electricity and am comfortable in my abilities to operate with it safely. I’m merely showing you what is involved, and if at any time you are not comfortable doing anything I’m demonstrating in this video, please call a professional. There’s no sense in you injuring yourself or others just to save a few bucks. With that being said, let’s dive in.
What You’ll Need
For this install we are going to be using some electrical conduit, some 8ga stranded wire, a 40amp dual pole breaker, a 4” electrical box, some screws or toggle bolts, some electrical tools including a fish tape and wire strippers/cutters, and a NEMA 50amp 220v plug.
 The Tesla Model 3 can handle up to a 50amp circuit to charge the vehicle. However, I am using a 40amp breaker with 8 ga wire because 8 ga wire is easier to pull through conduit than 6ga wire. The lower the gauge of the wire, the thicker it is and the more amperage it can accommodate. Here’s a basic amperage rating for the various thicknesses of wiring you’ll typically find in your home.

I’ve also done this in the past using a 30 amp circuit and 10 ga wire. The car will charge either way. However, the larger the circuit, the faster it will charge.
The first thing we’re going to do is turn the power off at the panel. Keep in mind that will kill all the power in the house and all the circuits. However, it doesn’t stop the power from coming in to the panel. Make sure you still work carefully and avoid the main leads coming into the panel.
Checking Your Breaker Panel
 You’ll need to make sure your panel has space to accommodate the breaker for the charger. I happen to know I have a few unused breakers in the panel from previously installed things. So I am going to repurpose a breaker that was previously used for an old electric oven. When selecting a breaker, you need to make sure that your new breaker matches the breaker style for your panel. I used a Square D panel which is usually written somewhere on the panel itself.
Running Electrical Conduit
 Next we’re going to install our box where we want it to be by screwing it to the wall on a stud or using toggle bolt anchors. From there we can start to install our conduit. I’m using schedule 40 PVC conduit because it’s easier to work with. However, I wanted to use 1” diameter conduit but it wasn’t in stock at the time so I went with ¾”. I’d recommend using the 1” conduit so that it’s easier to pull the wiring through.
Installing the conduit will depend on your location. In this case I’m going up the wall, through a dividing wall into different portion of the garage, and then connecting to the panel. Using a pair of PVC cutters and a tape measure makes this part pretty simple. When you get to a corner, you can use one of these 90° junctions. Once you have the majority of the conduit run, connect it to your panel box by removing one of the panel knockouts and connecting it with a connection and nut. I recommend dry fitting all the pieces and making sure everything looks good before going back and gluing up your connections.
Pulling Your Wiring
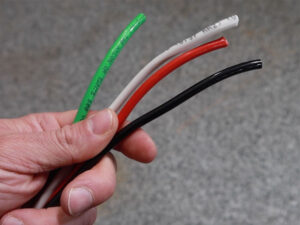 Now comes the fun part of pulling your wiring. The thicker your wiring, the more twists and turns you have, and the smaller your conduit, the harder it will be to pull. That’s why I recommend using the 1” conduit and the 8ga stranded wire. Stranded wire is essential to be able to pull. I’ll be pulling 4 wires. A red and a black, which will be the hot wires, (110v’s each which add up to 220v) a neutral wire, and a ground wire. Feed the wire fish tape through the conduit until it pops out the other side. It doesn’t necessarily matter which direction you pull from. I opted to pull away from the panel towards the end box. Once your fish tape is popped out the other end, you have to attach your wire to it. It involves stripping back a bunch of the wiring, twisting it together, and making everything as small as possible. You also don’t want to be shy about taping the hell out of it. You’re going to be wrenching on it pretty good and you don’t want to have it come apart halfway through your conduit run.

I screwed up in this case because I tried to pull the whole lengthall at once. If you have a 90° junction anywhere in your run, this is going to be really hard to do. I should’ve started pulling from the 90°, got the wire to this point, and then unhooked everything and started over for the rest of the way. I ended up doing anyway but it was more difficult than it should have been.
Once I pulled it all the way through to the box, I made sure I had about 8” sticking out of the box after cutting off the waste from the fish tape.
Connecting to the Panel
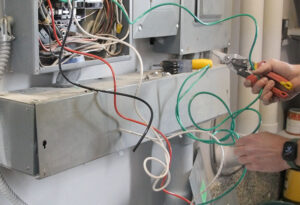 Back at the panel you need to make sure to give yourself plenty of length in the wiring to keep it tidy around the outside edges of the panel box. I happened to notice someone previously installed some wiring in this box where the ground crosses over in front of some of the breakers because they didn’t leave enough length. That’s a big no no and something I’ll have to fix.
Make sure you have enough slack in the wiring to make the connections at the neutral and ground bar, and to your new breaker for the hot wires. Once you know you have enough length, cut off the excess.
Connect the white neutral wire to the neutral bar in the panel. Then connect the ground wire to the ground bar. Next connect each of the hot wires to each of the connections on the bottom of the breaker itself. It doesn’t matter which one goes to which. Make sure they’re stripped to the right length and tighten them down securely. Then place the breaker into its location in the panel and snap it into place.
Connecting the Receptacle
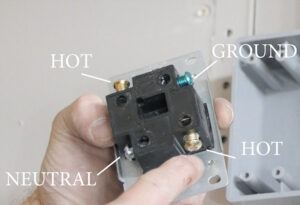
From there we’ll go back to the other end and make the connections on the receptacle. I’m using the 50amp receptacle but you can use different receptacles and Tesla adapters depending on your setup. The 2 hot wires (the red and black) get mounted to each of the brass terminals on the receptacle while the white gets connected to the silver terminal screw and the ground connects to the green terminal. Make sure everything is tightened securely and fold the wires back into the box and screw the receptacle in place.
Next, I’m going to close up the electrical panel and turn the power back on at the main breaker. Then I’ll turn on my newly installed breaker to test out the circuit before I put the cover on the box.
Once I plug everything in, it looks like everything is working as it should. Lastly I’m going to just add a cover to the box and install this little charger mount and cable management rack I found on Amazon.
Finished Charger
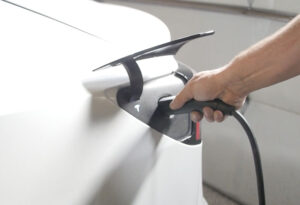 And that’s it! I now have an electrical vehicle charger set up in the garage. You can charge the car off a normal 110v outlet but it takes a really long time to charge. If you drive a lot, it might not be sufficient for you. This way the car charges relatively quickly and you can top off anytime you’re at home.
Thanks very much for checking out this video and I hope you learned something about installing a 220-240v circuit. This process can be used for more than just electrical vehicles. The install is pretty similar for other 220v circuits like large electric appliances, heaters, welders, shop tools, etc. Once you get used to understanding circuit and wiring sizes, etc you’re not really limited to what you can do.
Thanks for checking out this project! Check out some of my other DIY Home electrical projects.


